Creating Simple Spring Boot Application Using STS In Eclipse
In this post we will learn how to create a simple Spring Boot application using STS in Eclipse IDE.
Developing Spring Boot Application using STS
Step 1:Once STS installed in eclipse,Click on file-->new-->other-->select Spring Starter project--->next
refer below snapshot.

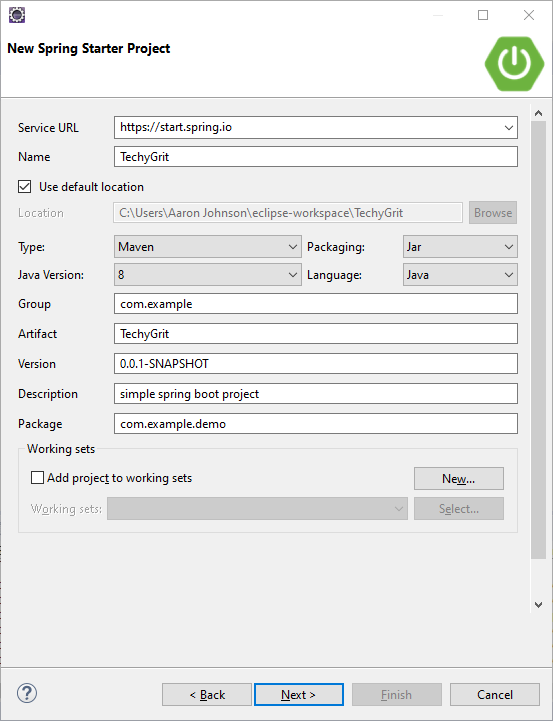
Step 2:After clicking on next ,you can see new Spring Starter project ,here you can add
- Group
- Artifact
- Version
- Description
- Package
- Java version
- Packaging
- Language
make sure you select Maven as Type and click next,refer below snapshot
Step 3:In the next screen shows up ,select the dependencies that you want to add Spring Boot project and click on finish refer the below snapshot.

Here i have selected web and dependencies for my project.
Step 4: Now new Spring Boot project will get created with the dependencies we have added as shown below
 |
| TechyGrit project created |
Step 5:The Spring Boot projects will have below files
1. SpringBootStarter java class, in this example - TechyGritApplication.java
2. Java class for testing
3.An empty properties file
4. A Maven pom file
5. Two files to execute the application from the command line
Below snapshot shows the main java class with project structure

@SpringBootApplication annotation is used to mark a configuration class that declares one or more @Bean methods and also triggers auto-configuration and component scanning.
Spring Boot SpringApplication class
SpringApplication class automatically creates the ApplicationContext from the classpath, scan the configuration classes and launch the application. This class is very helpful in launching Spring MVC or Spring REST application using Spring Boot.
Step 6:Next we need to create a controller class for spring boot project,Right click on main package com.example.demo-->new-->Class-->finish.below snapshot refers the controller class

Our app will now return 'Welcome to SVDreams' when we hit the root URL via a request mapping
@RestController annotation is looked up and a Spring bean is created from the MyController class when the service is invoked .
Step 7:The default tomcat port refers is 8080. If it needs be changed please change it in the in application properties as shown below

Now run the application by right click-->project-->run as-->Spring Boot App.Below snapshot refers how the spring boot application runs with the embedded tomcat server in local host 8080.

Step 8: Once the application is started, launch your browser and navigate to http://localhost:8080/ see our message in a below snapshot our application launched successfully.

Thanks to STS tooling, there's no reason to build your Spring Boot apps from the command line. You can do all of your work within your favorite IDE.


thalabathi vera level!!!
ReplyDelete